Overview
Officeless Insider is branded VS Code Insiders with every Code Intelligence extension pre-installed. Plugins cannot be removed but update when new VSIX builds ship. The IDE teaches assistants how to work on Officeless projects; your repo still holds the implementation (React UI, services, tests).
- Platform — workflows, auth, APIs (Officeless)
- Your project — UI,
src/services/officeless/, tests - Guardrails — markdown rules the IDE (and synced tools) load for AI
- Officeless MCP — live platform tools (projects, forms, workflows) your AI can call securely
Code Intelligence plugins (publisher: mekari-vas)
Extension IDs use publisher mekari-vas, aligned with the
*.vas.mekari.com platform domain. Insider embeds the latest stable
VSIX at build time; updates ship via
Officeless: Check for Extension Updates or from
code-intelligence.vas.mekari.com/download/vscode.
| Extension ID | Install on standard VS Code |
|---|---|
mekari-vas.officeless-code-intelligence |
Download VSIX → Extensions → ⋯ → Install from VSIX… |
mekari-vas.officeless-ai-context |
Hub extension — required for guardrail browser commands |
mekari-vas.officeless-mcp |
Then Command Palette → Officeless: Connect MCP |
mekari-vas.officeless-guardrails-global … -cimb |
Optional per-module VSIX; Insider includes all eight built-in |
macOS menu bar bridge bundle ID:
com.mekari.vas.officeless-code-intelligence · Insiders IDE:
com.mekari.vas.officeless.ai.insiders
1. Install the IDE
macOS
-
Download the latest
.dmgfrom the home page. - Open the disk image and drag Officeless AI Insiders to Applications, then eject the volume.
- Launch from Applications. Releases are notarized by Apple — no Terminal workaround required.
Windows
-
Download the
Setup EXE(recommended) or portableZIPfrom the home page. - Setup EXE: run the installer and launch from the Start menu.
- ZIP: extract the archive and run Officeless AI Insiders.exe.
2. First launch & in-IDE walkthrough
- Launch Officeless AI Insiders from Applications.
- Open the welcome walkthrough: Help → Welcome → choose Officeless AI Insiders.
- Open the full guide anytime: Cmd+Shift+P → Officeless: Open Welcome Guide.
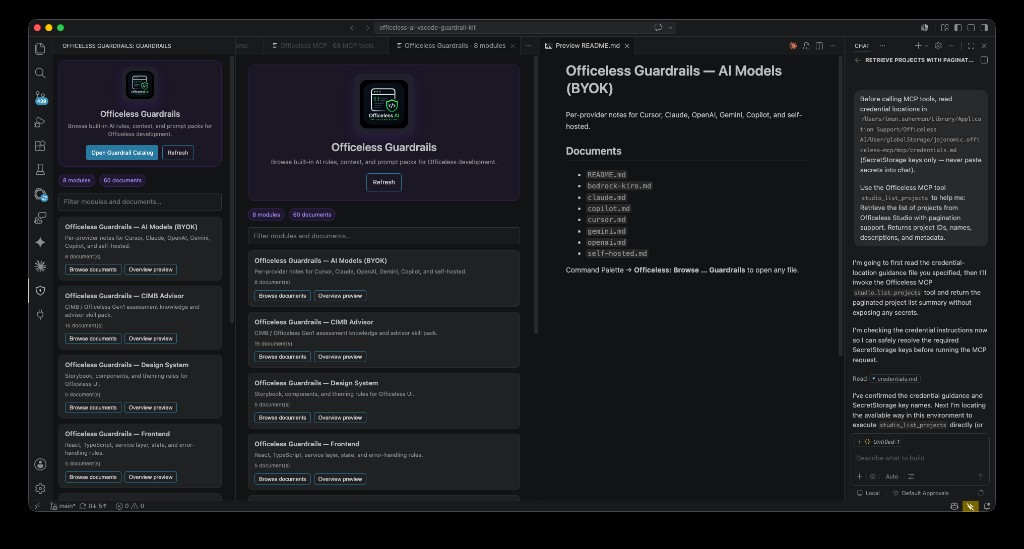
- Browse all guardrail packs: Officeless: Browse All Guardrail Extensions.
Built-in Microsoft Copilot is disabled in this build. Configure a real AI provider next — do not use the fake Continue with Officeless sign-in screen.
3. AI chat & inline completions
If the IDE shows Sign in to use GitHub Copilot with Continue with Officeless, close it. This build has no Officeless cloud AI account. Use one of the options below.
Option A — Continue (BYOK, recommended)
-
In Insiders: Extensions → install
Continue (
continue.continue). -
In the guardrail kit repo:
npm run setup:byok npm run sync-context -- --target /path/to/your-project --continue --all-tools -
Open the Continue side bar → add a model (OpenAI,
Anthropic, Ollama, etc.) using keys from
.env.local(never commit keys). - Use Continue for chat and edits — not the generic Copilot sign-in panel.
Option B — GitHub Copilot (Marketplace)
- Extensions → install GitHub Copilot and GitHub Copilot Chat (publisher: GitHub).
- Command Palette → GitHub Copilot: Sign In and authenticate with your GitHub account (per org policy).
-
Sync instructions:
npm run sync-context -- --target /path/to/your-project --copilot
Option C — Cursor or local AI
- Cursor: sync guardrails and use Cursor IDE, or run Officeless: Copy Cursor Rules to Workspace in Insiders.
-
Local (Ollama / Open WebUI): use Continue with an
OpenAI-compatible URL (e.g.
http://localhost:11434/v1).
In the IDE: Cmd+Shift+P → Officeless: Open AI Setup Guide for the full in-app guide.
4. Open your Officeless project
- File → Open Folder and select your implementation repo (dashboard, portal, or embedded UI).
-
Ensure project context exists where possible:
project-context/fsd/(authoritative scope),project-context/api-contracts/, andsrc/services/officeless/. -
Optional: use the kit workspace template —
vscode/workspace-template/officeless.code-workspace— after cloning the guardrail kit.
5. Officeless MCP
Officeless MCP connects the IDE to the Officeless platform through the
MCP gateway at
https://mcp-officeless.mekari.com/mcp. After you connect, AI assistants
(Copilot Chat, Continue, Claude, Gemini, and others) can call platform tools —
list Studio projects, inspect forms and tables, search knowledge, run reports — using
real data instead of guessing.
Guardrails teach the model how to build on Officeless; MCP gives it what exists on the platform. Use both together: browse guardrail modules for coding rules, then ask the chat to invoke MCP tools for live project metadata.
Connect to the MCP gateway
- Cmd+Shift+P → Officeless: Connect MCP (or open the MCP Connect side bar).
-
Enter your organisation’s OAuth client ID and
client secret. Secrets are stored in VS Code
SecretStorage only — never in
settings.jsonor your repo. - Click Save credentials, then Connect. When connected, the status badge shows Connected and the gateway reports how many tools are available (typically 60+).
- The extension syncs into VS Code’s native MCP config so GitHub Copilot Chat can call Officeless tools directly — no manual bearer token paste in chat.
studio_list_projects without exposing secrets in the prompt.
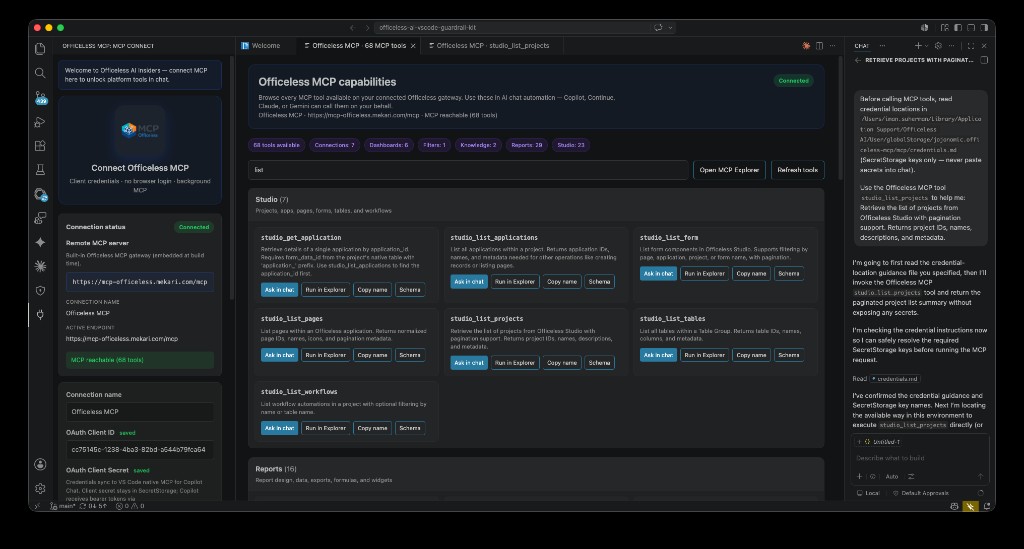
Browse tools & run from the IDE
After login, open the live tool catalog:
- Officeless: Open MCP Tools Catalog — searchable list of all gateway tools, grouped by area (Studio, Reports, Dashboards, Knowledge, Connections, …).
- Officeless: Open MCP Explorer — run a tool with parameters and inspect the JSON response in the IDE.
-
MCP: List Servers (VS Code) — confirm
officeless-mcpis connected for Copilot Chat.
Common Studio tools include:
| Tool | Purpose |
|---|---|
studio_list_projects |
Paginated list of Officeless Studio projects (IDs, names, metadata) |
studio_list_applications |
Applications within a project |
studio_list_pages / studio_list_form |
Pages and forms in Studio |
studio_list_tables / studio_list_workflows |
Data tables and workflow definitions |
Each tool card offers Ask in chat (pre-fills a safe prompt with credential guidance), Copy name, and Schema for parameters.
Use MCP in AI chat
Example workflow — retrieve projects with pagination:
- Connect MCP and configure your AI provider (Continue or Copilot — see section 3).
- Ask in chat, e.g. “List Officeless Studio projects with pagination.”
-
The assistant loads the credential manifest from extension storage (path shown in chat —
for the AI only, not for pasting secrets) and invokes
studio_list_projects. - Review the returned project list; use guardrails when you implement UI or services against that data.
- OAuth client secret and access tokens live in SecretStorage only.
- Never paste client secrets or bearer tokens into chat or commit them to git.
-
The generated
credentials.mdmanifest (under extension global storage) tells the AI where credentials are — not the secret values. -
Synced repos may include
.officeless-ai/mcp/credential-locations.mdas a static reference after guardrail sync.
Command Palette — MCP
Officeless: Connect MCP
Open connect panel; save OAuth credentials
Officeless: Open MCP Tools Catalog
Browse all gateway tools by category
Officeless: Open MCP Explorer
Run tools and inspect responses
Officeless: Disconnect MCP
Logout and clear stored tokens
Your organisation supplies the OAuth client ID (public). Client secret is issued per environment — ask your Officeless / Mekari platform admin if you do not have one.
6. Sync guardrails into your repository
Bundled rules live inside the IDE. To give Cursor, Continue, Copilot, and agents the same context inside your repo, sync into the project (one-time per project, re-run when guardrails update).
Recommended: apply from Officeless AI Insiders (in-IDE)
- Open your project folder in Officeless AI Insiders.
- Cmd+Shift+P → Officeless: Apply Guardrails to This Project.
- Select which tool integrations you want (Cursor / Copilot / Continue).
This creates (in your repo):
| Path | Purpose |
|---|---|
.officeless-ai/ |
Full guardrail context synced into the repository |
project-context/ |
Scaffold folders: fsd, api-contracts, qa, brd, ai |
.cursor/rules/officeless-ai.mdc |
Cursor rules (optional) |
.github/copilot-instructions.md |
GitHub Copilot instructions (optional) |
.continue/config.yaml |
Continue config wired to .officeless-ai/ (optional) |
.officeless-ai/mcp/ |
MCP credential reference and usage notes for AI chat (optional) |
Alternative: sync from the guardrail kit (CLI)
git clone https://bitbucket.org/jojocoders/officeless-ai-vscode-guardrail-kit.git
cd officeless-ai-vscode-guardrail-kit
npm install
npm run sync-context -- --target /path/to/your-officeless-project --all-tools
Tip: if you only need Cursor rules (without copying full context), run Officeless: Copy Cursor Rules to Workspace.
7. Configure AI (bring your own key)
-
In the guardrail kit repo:
Follow prompts; output isnpm run setup:byok.env.local(gitignored). -
Install recommended extensions (if not already in the Insiders profile):
npm run install:extensions - Use Continue (or your provider) inside Insiders with Officeless context. Per-provider notes are under guardrail module Models (BYOK).
Never commit API keys. Use env vars or your org’s secret store.
8. Use guardrails in daily development
Guardrails are markdown rules — use them actively, not only at install time.
Workflow (recommended)
-
Start from FSD — functional spec in
project-context/fsd/is authoritative; BRD is background only. - Load boundaries before coding — Command Palette → Officeless: Open AI Boundaries or Open System Context.
- UI work — open Officeless: Open Design System Rules and use Storybook; no ad-hoc UI libraries.
-
API work — all HTTP via
src/services/officeless/; open Officeless: Open API Integration Rules. - Review output — human review + tests; no hallucinated endpoints or fields.
Command Palette reference
Officeless: Open Welcome Guide
Full IDE overview and links
Officeless: Open Welcome Walkthrough
Step-by-step on Welcome page
Officeless: Browse All Guardrail Extensions
Quick-pick every module
Officeless: Browse … Guardrails
One command per module (Global, Platform, …)
Officeless: Open System Context
Global platform + scope rules
Officeless: Open AI Boundaries
Allowed / not allowed for AI
Officeless: Copy Cursor Rules to Workspace
Sync Cursor rules into open repo
9. Guardrail modules — when to use each
| Module | Use when you… |
|---|---|
| Global | Need system context, security, dev/test/release rules, or AI boundaries |
| Platform | Integrate Officeless APIs, auth, workflows, or embedded UI |
| Design system | Build UI components, theming, or Storybook usage |
| Frontend | Work on React, TypeScript, services, state, or errors |
| Prompts | Run structured tasks: generate, review, refactor, validate scope |
| Roles | Adopt architect, QA, solution engineer, or advisor personas |
| Models (BYOK) | Configure OpenAI, Claude, Gemini, Cursor, Copilot, or self-hosted |
| CIMB advisor | Assess Officeless Gen1 (CIMB UAT) — forms, tables, connectivity |
Open any module via Officeless: Browse [module] Guardrails in the Command Palette.
10. Prompt templates
Under ai-context/prompts/ (and synced .officeless-ai/prompts/):
- generate-feature — scaffold from FSD with guardrails applied
- review-code — check against boundaries and service layer
- refactor — safe refactors within Officeless patterns
- validate-scope — confirm work stays inside FSD
- assess-officeless-gen1 — Gen1 assessment (with CIMB pack)
Paste or reference these at the start of an AI session so the model inherits
the same constraints as the IDE. For smaller local models, load only
00-system-context.md, 02-ai-boundaries.md, and the
relevant FSD section.
11. Per AI tool
| Tool | How guardrails load |
|---|---|
| Insiders (built-in) | Bundled extensions + Command Palette commands |
| Cursor | .cursor/rules/officeless-ai.mdc after sync |
| Continue | .continue/config.yaml docs providers |
| GitHub Copilot | .github/copilot-instructions.md; native MCP via officeless-mcp when connected |
| Officeless MCP | Built-in extension; Copilot Chat + Explorer tools after Officeless: Connect MCP |
| Cline | custom-instructions.md in extensions template |
Conflict resolution: project FSD wins on business scope; global guardrails win on security, design system, and service architecture; API contracts win on field names.
12. Verify & troubleshoot
From the guardrail kit repo:
npm run doctor
npm run validate:context- Blank window / “default chat agent” — re-run
npm run build:vscode:preparein the kit (dev builds). - AI ignores rules — confirm
.officeless-ai/exists and you referenced boundaries in the prompt. - Wrong API shape — point the model at
project-context/api-contracts/. -
MCP not connected — run Officeless: Connect MCP; check
MCP: List Servers shows
officeless-mcpconnected. -
Copilot cannot call MCP tools — confirm Copilot Chat is signed in and native MCP sync is
enabled (
officeless.mcp.syncNativeMcpConfigis notfalse). - Chat exposes secrets — stop the session; credentials must stay in SecretStorage. Reload credential guidance via Officeless: Open MCP Tools Catalog.